Illustrator
- How do I reduce the DPI of an Illustrator file for print jobs?
- I saved as a PDF and my Illustrator file still will not print. What should I do?
- How do I create outlines for my type in Illustrator?
- How do I flatten my artwork to prepare my Illustrator file for printing?
- How do I embed images in Illustrator?
How do I reduce the DPI of an Illustrator file for print jobs?
Go to File > Print > Output > Set to "Adobe PDF" under the printer dialog box> change the dpi to 300dpi.
I saved as a PDF and my Illustrator file still will not print. What should I do?
Your file may still have some Illustrator properties that are not being read by the printer. Save a copy, choose Adobe PDF, and deselect "preserve Illustrator editing capabilities." You will still be able to edit your original Illustrator file. Open the PDF in Adobe Acrobat Pro and choose File > Save As Other... > Optimized PDF. Print the optimized PDF from Acrobat Pro.
How do I create outlines for my type in Illustrator?
Go to Type > Create Outlines. Outlines should only be created once you are done with the work. Once the outlines are created the text is not editable, so remember to save a copy of your original file before creating type outlines.
How do I flatten my artwork to prepare my Illustrator file for printing?
Go to Window > Layers. In the layers palette, click on the arrow in the upper right corner, select "Flatten artwork". You will not be able to make changes after flattening, so save a copy of your file before flattening.
How do I embed images in Illustrator?
Embedding images should only be done when you are done with the file and no further changes will be made. Once the image is embedded it cannot be changed. Go to Window > Links to open your Links palette. Select the image you want to embed. In the links palette, click on the arrow in the upper-right corner, select "Embed Image."
InDesign
- How do I convert my InDesign file to a PDF for printing?
- How can I do InDesign Booklet printing?
- The Acrobat Pro booklet print settings do not give me enough control over my gutters and margins. Is there another way to print my booklet?
- I am printing my tabloid booklet double-sided on a color printer and some of my pages are cropped in half. How do I fix this?
How do I convert my InDesign file to a PDF for printing?
To convert your InDesign file to a PDF for printing, follow the below instructions:
-
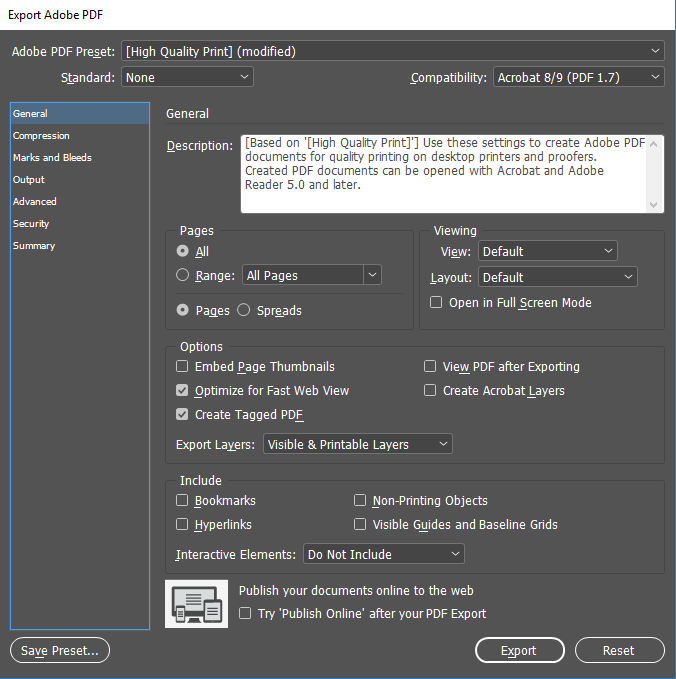
Go to File > Export. In the Export dialog box, choose "Format:" to "Adobe PDF (Print)" and select Work In Progress as your save location.
- In the Export Adobe PDF dialog box, make sure that "Adobe PDF Preset" is set to "NewschoolPDF." Please note that InDesign will not notify you when the conversion to PDF is complete. Larger files may take longer to process. Open the resulting file with Adobe Acrobat Pro and print.
How can I do InDesign Booklet printing?
To print an InDesign booklet, follow these steps:
(Saddle-stitched booklets must have a number of pages that is a multiple of 4 (i.e. 4 pages, 8 pages, 12 pages, etc.) If your document doesn't have that number of pages, then you have to add in blank pages.)
-
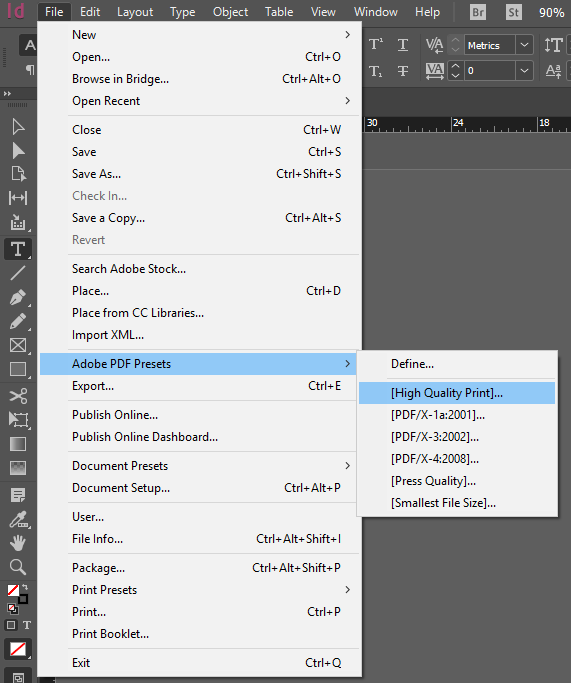
Create file in InDesign. Under File select Adobe PDF Presets > High Quality Print

-
Export File as High Quality Print

-
Save File to Works in Progress as PDF. Open File With > Adobe Acrobat Pro from the Works in Progress.
-
File > Print
-
Select Printer
-
Subset select > Booklet Printing
-
Setup Booklet Printing, select a Printer and click Print
The Acrobat Pro booklet print settings do not give me enough control over my gutters and margins. Is there another way to print my booklet?
If you need more detailed control over your booklet print settings, you can print your booklet from InDesign as a PostScript file, then convert that file to PDF. Follow these steps:
-
Create your booklet in InDesign
-
Go to File > Print Booklet. This will open the "Print Booklet" dialog box.
-
In "Print Booklet" dialog, click Print Settings. This will open the "Print Settings" dialog box.
-
In "Print Booklet" dialog, go to "Printer:" drop-down menu and select "PostScript file."
-
In left-hand menu tree, choose "Setup." Select your desired Paper Size, Orientation, Scale and Page Position.
-
In left-hand menu tree, choose "Marks & Bleeds." Select your desired printer marks and bleeds.
-
In left-hand menu tree, choose "Output." Select your desired color output settings.
-
Click "OK" to return to "Print Booklet" dialog. In the left-hand menu tree, select "Preview" to review your document setup.
-
Click "Print." Save your PostScript file (.ps) to the Work In Progress drive.
-
Launch Acrobat Pro. From the "Create" menu, choose "PDF from File" and select your PostScript file. This will convert the file to PDF.
-
Use Acrobat Pro and print as a non-booklet, double-sided print.
Note: you may need to adjust the double-sided printing options ("Long-edge vs. Short-edge Binding" on Mac, "Flip Pages Up" option on PC). See the Printing Tipsheet for details on locating these options.
I am printing my tabloid booklet double-sided on a color printer and some of my pages are cropped in half. How do I fix this?
First, make sure that "Auto-rotate and center" or "Auto-rotate pages" is not checked in the print dialog box. Then, adjust your Orientation settings under File > Print Setup.
Note that this orientation is relative to the way the page appears on your screen - for example, if your tabloid page appears in landscape orientation on your screen (ie., 17" wide by 11" tall), you will need to select "portrait" orientation in the Print Setup menu to avoid cropping.